The Properties pane
The ATR CustomTools functionality provided by the Properties feature allows you to manage the custom properties of the SOLIDWORKS document, including weldment cut-list items. The Properties pane is fully customizable. You can customize the pane in the ATR CustomTools Options. The custom property values are stored into the custom properties of the SOLIDWORKS document and also into the ATR CustomTools database. The Properties pane can be customized also specific for the different types of documents (3D model, assembly, part, drawing and weldment).
You can also maintain the color, mass and density of your SOLIDWORKS documents with help of the Properties pane.
Properties are grouped by the Property groups defined in ATR CustomTools Options.
Use the following links to navigate faster to a section of the Properties pane help you are looking for.
- Action
- Actions for Virtual Components
- Configurations
- Projects
- Property Controls
- Properties Based on the Lookup List
- Multilingual properties
- Dimension properties
- Component Material
- Component Mass
- Storing the Mass/Density Value
- Linked Properties
- Buttons Depending on the Property Definition
- Common Pane Buttons
- Use Properties in a BOM of Your SOLIDWORKS Drawing
In SOLIDWORKS, click the
![]() button in the ATR CustomTools
toolbar, or click Tools, ATR CustomTools, Properties.
button in the ATR CustomTools
toolbar, or click Tools, ATR CustomTools, Properties.
In ATR CustomTools Viewer, click the Properties command located in the ATR CustomTools Tools group.
The Properties pane appears.
The Action group remembers its' last state. For example, if the Action group has left collapsed on the most recent use, the Action group remembers the state so it opens as collapsed also on next time.
To define the custom properties of different components, note that the pane can be pinned and changes must
be accepted by clicking ![]() or by pressing the
Enter key before selecting a different component.
or by pressing the
Enter key before selecting a different component.
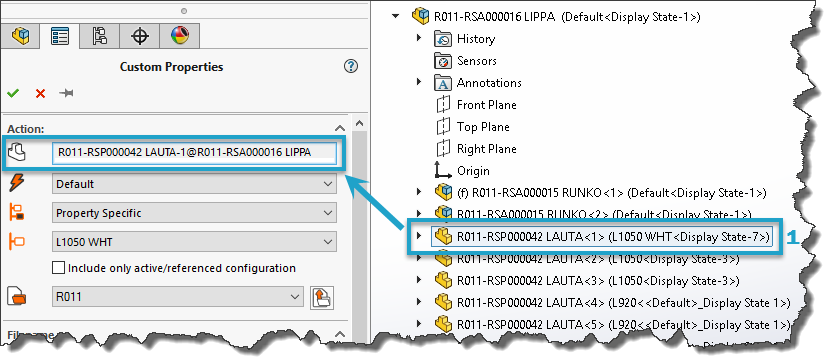
Properties defined for the selected component are retrieved into the Properties pane. The blue "1." marking indicates the selected component in the Feature Manager tree view.
![]() . Select an action to perform against the
selected component on click of the
. Select an action to perform against the
selected component on click of the ![]() button.
button.
The Action options are not available for weldments and weldment cut-list-items.
| Default |
If the value of the custom property used to define the filename is modified, then the prompt dialog appears where the user is asked to define an action to do. The filenaming rules are defined in the Project options. If a different action is selected, other than the default action, for a virtual component saved inside an assembly, then the component is saved as an external file. |
| Save As |
Saves the document with a new filename. The values of the modified Property are only saved to new document. If the document is referenced by an opened assembly, then the file references are updated. During a Save as action, the user will be prompt to copy existing drawing(s). |
| Save As Copy |
Saves the document with a new filename and leaves the original file unmodified. ATR CustomTools offers the possibility to automatically open the copied documents. To open the copied document, select the Open created document when performing Save As copy option from the File Operation options in the ATR CustomTools Options. The user can also define if the new file should always be opened or never, or always get prompted. The new file name generated by the ATR CustomTools will based on your File Naming settings. If no filenaming rules have been defined in the ATR CustomTools Options, then the file name will use SOLIDWORKS rules. While performing a Save as Copy action, if the model has one or more related drawings, then the user is prompted to copy the drawing(s). |
| Rename And Move |
Use the Rename and Move action to move selected document into new location and/or change its' file name. References of the selected component are being updated in all open documents referencing to the renamed and moved component. Document references are not updated in documents that are not open while the selected component is being renamed and moved. This operation is not allowed when the file is read-only, or it is located in SOLIDWORKS PDM Vault. |
| Rename |
Renames the selected document. References of the selected component are also updated in all open documents referencing to the renamed component. Document references are not updated in documents that are not open while the selected component is being renamed. This operation is not allowed when the file is read-only, or it is located in SOLIDWORKS PDM Vault. |
| Copy as new component |
Copies the selected component and inserts the copied component into the assembly. |
| Replace components |
Replaces the selected components by the copies of the selected components in assembly. For Example: If you are designing a table and you want to edit two of the table legs, use the Replace components action to copy the desired components and replace them by the copied ones, then you can edit those two parts without making unwanted changes to the legs which does not need any changes. |
| Save As and break external refs |
Select this action to save the document and break all the external references of the saved document. Any references does not change in the original document. |
The default action in the floating Properties dialog box is Save As Copy to avoid loss of data while handling existing files. Also the Save As dialog box which appear after clicking the OK button in the floating Properties dialog box have a dynamic title which refer to the save action selected.
| Save Internally | Use this action to save the virtual component internally into the parent assembly in which it is being used in. All external references are deleted from the virtual component. In the source document of which the virtual one was made from, the external references stays unchanged. |
| Save Externally | Use this action to save the virtual component as a new part or assembly. |
The last selected action for the virtual component is selected automatically on next time you perform the Properties command for the virtual component.
Saving operation creates the destination folder automatically if it does not already exist when saving a component into an external file using the Save Externally action.
![]() . Select the configuration(s) where the
Property values will be written to. The model document remembers the last configuration selection.
. Select the configuration(s) where the
Property values will be written to. The model document remembers the last configuration selection.
Examples
Setting the Target Configuration
| Document properties | Modified Property values are written into the SOLIDWORKS document level property attributes. All the configuration specific Property values associated to an attribute with the identical name are deleted. |
| All configurations | The Properties are written into all existing configurations of the selected document. |
| This Configuration |
The Property values are written to the selected configuration.
Select the target configuration by using the
TIP:
You may apply changes to the configuration specific properties associated to several
configurations by selecting the This configuration option and then changing the desired
target configuration using the
|
| Specific Configuration(s) |
Allows you to select the configuration, which the Property values will be written to. You can select
one or more configurations.
The
NOTE:
A warning message appears in the Properties pane when saving the new property values into
All configurations and one or more configurations already have values assigned in the
changed properties. Warning message appears also if saving the properties into the
Document properties and one or more configurations already have values assigned on the
configuration level.
|
| Property Specific |
Select the Property Specific option as the target configuration to write the assigned property
values in a level of the target document specified in the Properties settings.
You can set up the desired document level to write the property value in by using the Initial Configuration setting located in the Basic Information page of the Property Wizard. |
| Document properties and active configuration | Write value assigned to a Property into the document properties and also to the active configuration of the selected SOLIDWORKS model. Property values written to the Document properties and active configuration appear in the document's Custom level Summary Information and also in the Configuration Specific level of Summary Information in the configuration active in SOLIDWORKS model at moment of saving the document. |
| Document properties and all configurations |
Write value assigned to a Property into the document properties and also to all configurations of the SOLIDWORKS model. Property values written to the Document properties and all configurations appear in the document's Custom level Summary Information and also in the Configuration Specific level of Summary Information in all configurations included in SOLIDWORKS model at moment of saving the document. Please refer to the SOLIDWORKS helps for the further information about the SOLIDWORKS document's Summary Information levels available. |
| Include only active/referenced configuration | Select this option to include only the active or referenced model configuration to the action performed by the Properties pane. |
Name of the active configuration could be retrieved to a Property with help of the property combination. Retrieving the configuration name to the Property makes easier to create e.g. configuration specific drawings from the model.
Let's say we have just created a new SOLIDWORKS part which is a piece of copper bar like shown in the following picture. The copper bar have been configured by it's length dimension for different purposes.
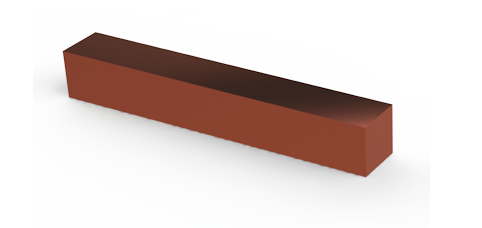
A copper bar with the Default configuration active.
The following table show where the Property values are written in the SOLIDWORKS document's Summary Information using the different options for the Property's Initial configuration:
| Resolved Value in SOLIDWORKS File's Custom/Configuration Properties | |||||||
|---|---|---|---|---|---|---|---|
| Property | Initial Configuration | Properties Value | Document Properties | Default | L150 | L200 | L210 |
| Purpose | Document properties and all configurations | Copper Part Sets | Copper Part Sets | Copper Part Sets | Copper Part Sets | Copper Part Sets | Copper Part Sets |
| Additional 1 | Document properties and active configuration | General Usage | General Usage | General Usage | No property/value | No property/value | No property/value |
| Drawing No | Document properties | 000001 | 000001 | No property/value | No property/value | No property/value | No property/value |
| Dimensions | Active configuration | FB-15x100-15 | No property/value | FB-15x100-15 | No property/value | No property/value | No property/value |
Let's say we have an existing SOLIDWORKS part which is a piece of gold like shown in the following pictures. This gold piece have been configured by its' features and the length dimension for different purposes.
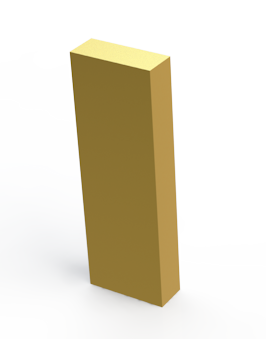
A piece of gold with the Default configuration active.
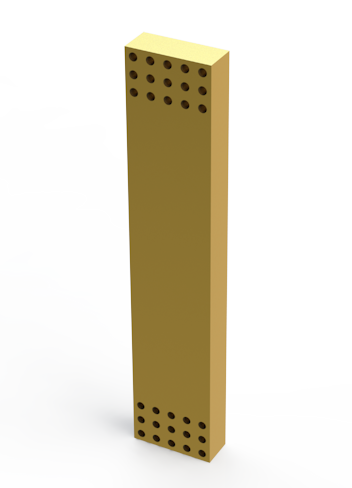
A piece of gold with the H250 configuration active.
The following table show where the Property values are written in the SOLIDWORKS document's Summary Information using the different options for the Property's Initial configuration:
| Resolved Value in SOLIDWORKS File's Custom/Configuration Properties After Changes (Old value if changed) | ||||||
|---|---|---|---|---|---|---|
| Property | Initial Configuration | Properties Value | Document Properties | Default | H200 | H250 |
| Purpose | Document properties and all configurations | Wall Support | Wall Support | Wall Support | Wall Support | Wall Support |
| Additional 1 | Document properties and active configuration | Extra Long Walls (Corner Piece) | Corner Piece (Corner Piece) | Corner Piece | No property/value | Extra Long Walls (No property/value) |
| Drawing No | Document properties | 000003 | 000003 | No property/value | No property/value | No property/value |
| Dimensions | Active configuration | FB-50x250-20 | No property/value | FB-50x150-20 | No property/value | FB-50x250-20 (No property/value) |
The gold piece was saved for the first time with the Default configuration active. For that reason the Dimensions property still have its existing value untouched in the Default configuration while the model is being saved for the second time, while it has the H250 configuration active. This behavior comes from the Dimensions property's initial configuration which is Active configuration so the new value is always written only to the configuration active on the saving moment.
A property called Additional 1 have Document properties and active configuration as its initial configuration so, when the model is saved second time, the new value defined in the Properties pane, gets written into the document itself and, into the active configuration which is H250 the second saving time mentioned in this example.
![]() Select the project where the selected component belongs to. You can either pick the desired project directly
from the drop-down list or start typing the name of the project you are looking for into the
Select the project where the selected component belongs to. You can either pick the desired project directly
from the drop-down list or start typing the name of the project you are looking for into the
![]() box to use the
Project Search feature to ease finding the desired project.
box to use the
Project Search feature to ease finding the desired project.
Once you select the project, the default values are automatically loaded to the Properties based on the default values set in the Projects options.
![]() Unload project specific values from the Properties. Unloading the default values from the
Properties does not remove the document from the project selected from the
Unload project specific values from the Properties. Unloading the default values from the
Properties does not remove the document from the project selected from the
![]() box.
box.
ID of the selected project is stored into the ATR CustomTools database when saving the document.
If the selected component is assigned to a project that has been deleted, a warning message appears at the top of the Properties pane when loading the component properties.
For files originally saved without a ATR CustomTools project, <No project> appears in the
![]() box. You can still assign the
document to an existing project, but <No project> cannot be selected for any document that
already has had a project selection applied. <No project> pre-selection ensures that ATR
CustomTools is not forcing file naming rules for legacy documents when accessing their Properties, so
the user must make a conscious decision to bring the document under ATR CustomTools Project automation. ATR
CustomTools encourages using Projects for document naming and location consistency also with legacy
files, thus a warning about applying <No project> will be given once for each document. The
warning message can be disabled for users at
Messages/Errors/Warning.
box. You can still assign the
document to an existing project, but <No project> cannot be selected for any document that
already has had a project selection applied. <No project> pre-selection ensures that ATR
CustomTools is not forcing file naming rules for legacy documents when accessing their Properties, so
the user must make a conscious decision to bring the document under ATR CustomTools Project automation. ATR
CustomTools encourages using Projects for document naming and location consistency also with legacy
files, thus a warning about applying <No project> will be given once for each document. The
warning message can be disabled for users at
Messages/Errors/Warning.
The last project selected from the
![]() box is remembered by ATR
CustomTools until the end of the current session. For example, while you make a set of new SOLIDWORKS part
documents for the same ATR CustomTools project, you need to select the project only when creating the first
part. After that, the same project is automatically selected again with the following parts until you close
SOLIDWORKS.
box is remembered by ATR
CustomTools until the end of the current session. For example, while you make a set of new SOLIDWORKS part
documents for the same ATR CustomTools project, you need to select the project only when creating the first
part. After that, the same project is automatically selected again with the following parts until you close
SOLIDWORKS.
Recently Used Projects
Based on your project usage statistics, ATR CustomTools creates a project group called Recent at the
top of your projects in the ![]() box in
the Properties pane. In the Recent projects, you find the top five (5) of your most recently
used projects.
box in
the Properties pane. In the Recent projects, you find the top five (5) of your most recently
used projects.
Example Use Case:
Let's assume you have an old part that was created without ATR CustomTools or the ATR CustomTools version used while the part was created did not have the Projects feature included.
In this case, your part cannot belong to any ATR CustomTools project. For that reason, your part has
<No project> selected in the
![]() box when you open the part's
Properties now using a ATR CustomTools version which has the Projects feature included.
box when you open the part's
Properties now using a ATR CustomTools version which has the Projects feature included.
A disk icon is located before every Property. It appears as
![]() when the value of a custom property has not been modified during the Properties session. If the related
value has been modified or if the user clicks on the disk icon, then it changes to
when the value of a custom property has not been modified during the Properties session. If the related
value has been modified or if the user clicks on the disk icon, then it changes to
![]() .
.
The icon appears like
![]() when the value of the custom property has been modified manually. When exiting the Properties pane, only the
modified Property values are written to the document and to the ATR CustomTools database.
when the value of the custom property has been modified manually. When exiting the Properties pane, only the
modified Property values are written to the document and to the ATR CustomTools database.
If the
![]() is clicked, the icon changes to
is clicked, the icon changes to
![]() and the value is considered as modified. This can be used, for example, to easily write a custom property
value to all configurations. If the
and the value is considered as modified. This can be used, for example, to easily write a custom property
value to all configurations. If the
![]() is clicked, the icon changes to
is clicked, the icon changes to
![]() and the last saved value of the property is shown in the control. The property is no longer considered as
modified. This operation can be used to cancel modifications.
and the last saved value of the property is shown in the control. The property is no longer considered as
modified. This operation can be used to cancel modifications.
The values of custom properties can also be retrieved from Lookup lists. The lookup list values can be defined by the user or retrieved from an external data source.
The values of the lookup list retrieved from an external datasource are always synchronized.
If the value of a custom property does not correspond to a value in the external data source, the value displayed will depend on the type of the used combobox:
| Combobox | The custom property will be empty if the value of the custom property does not exist in the external data source. |
| Editable combobox | The new value retrieved from the database overwrites the existing value if the value of the custom property does correspond to a value in the external data source. |
Changing the type of the Property to combobox does not clear the assigned value, no matter whether or not the assigned value exists in the lookup list.
When you link properties to an existing property whose value is based on a dictionary, the linked properties get their values automatically based on the same dictionary.
However, if you manually change the source value of translated properties and the new value does not exist in the source dictionary, the properties which are translated based on the changed value keep their last saved values.
Add dimension values into the custom properties by clicking the dimension field and then clicking the desired dimension on the model.
The SOLIDWORKS model can be rotated to other positions while the Properties pane is active to ease selection of the dimension values.
Dimensions of the active component appear on the model automatically when the dimension value box is selected from the Properties pane.
Each Property whose type is Dimension has the
![]() button associated to the dimension value box. Use the
button associated to the dimension value box. Use the
![]() button to clear the dimension value from its associated dimension value box.
button to clear the dimension value from its associated dimension value box.
Decimals
Usually, the component dimensions have to be presented by some specific accuracy. To increase the value accuracy, we need to add decimals. By default, ATR CustomTools respects the Windows Regional Settings (Additional settings) to determine the separator character for the decimals. So does SOLIDWORKS as well.
However, SOLIDWORKS has an option to set a custom separator and therefore ignore the separator defined in the Windows Regional Settings. While the SOLIDWORKS setting is being used, ATR CustomTools uses the separator defined in SOLIDWORKS System Options too.
The component material could be assigned to the custom property. The selected material could be the SOLIDWORKS material or it could be a custom material specified in the ATR CustomTools Profile Options. Assigning a SOLIDWORKS material as the Property value also sets the component material in the SOLIDWORKS Feature Manager.
By default, the component mass is calculated automatically based on the density of the selected component
material. Click the
![]() button to deactivate the mass link and enable editing of the mass value in the related property box if
necessary. Once deactivated, enter the desired mass value into the related text box to store the
user-defined component mass into the SOLIDWORKS file properties. The user-defined mass value does not affect
the material information.
button to deactivate the mass link and enable editing of the mass value in the related property box if
necessary. Once deactivated, enter the desired mass value into the related text box to store the
user-defined component mass into the SOLIDWORKS file properties. The user-defined mass value does not affect
the material information.
|
|
Activate/Deactivate the mass link. The state of this button is stored into the SOLIDWORKS file to determine whether or not the mass link is activated. By default, the mass link is activated. |
If the mass link is broken or inactive, the user can enter the desired mass value to be assigned for the component. The mass value is written into the SOLIDWORKS document properties also in that case.
The total mass of an assembly is calculated based on the materials assigned to the parts included in the assembly. Select the desired part from the assembly to show the mass of the specific part.
The Property used to assign the mass value needs to have the following settings selected in the Functions page of the Property Wizard:
| Before function | GetMaterials |
| After function | SetDensity |
The following table describes the states of the Property linking button:
| Link Status | Meaning | |
|---|---|---|
| Active | Property link is active. Property value is automatically retrieved based on the source property set in the Property settings. | |
| Inactive | Property link is inactive. Property value could be typed by the user. | |
You can also have a property that combines a part of manually typed text and a property or properties that retrieve their values from some other properties and still maintain a link between the linked part of the value and its source.
The Button function allows you to define functionality to a custom property control executed by clicking a button next to the property value box.
| Button | Property's Button Function | Description |
|---|---|---|
| GetCode | Opens the New Code dialog box which is used to get a unique code for the property. | |
| OpenDictionary |
Select a translated value for the Property from the Dictionary. Use the ATR CustomTools Administration Tool or the Translation Options in the Database Options tab of the ATR CustomTools Options to manage your dictionaries. |
|
| Revisions | Manage the Revision Properties of the selected document with the Revisions dialog box and its functionality. | |
| GetColor | Assign Color for the selected model. | |
| GetRALColor | Assign RAL color for the selected model. | |
| GetDatabaseItem |
Get the values for one or more Properties from the external data source using the desired database search group defined in the ATR CustomTools Options. This function allows you to populate custom properties, for example, from an ERP system. All buttons related to any other properties using the same Database search group go to the disabled state once the link has been established from the custom property to an external data source. Disabling the buttons related to any other properties using the same Database search group prevents the unexpected overwriting of the linked values. |
|
| SetEntityData | Set entity data for the model. The entity data values are stored only in the database, so the values do not appear in the custom property boxes. | |
| GetUserScopeData | The Custom Scope Properties dialog box appears. With the Custom Scope Properties, you can assign custom matrix data into your SOLIDWORKS document. Like the Custom Entity Data, the Custom Scope Properties does not set a value into its associated Property either. The matrix data added by the Custom Scope Properties is stored only in the ATR CustomTools Database. |
Writes the Properties and closes the Properties pane.
Cancels all the changes and closes the Properties pane.
Pins the Properties pane open so that it does not disappear when you click the
![]() button. Pinning the Properties pane
open allows you, for example, to write the configuration specific Property model property values
without having to open the Properties pane again after each configuration.
button. Pinning the Properties pane
open allows you, for example, to write the configuration specific Property model property values
without having to open the Properties pane again after each configuration.
You can insert the ATR CustomTools Properties as new columns into the BOM (Bill of Materials) of the SOLIDWORKS Drawing created from the model. For more information about the SOLIDWORKS Bill of Materials feature, please see the SOLIDWORKS Help.